G Router IP Cam Setup: A Comprehensive Guide
Are you looking to install and configure your IP camera for seamless surveillance and remote monitoring? Look no further! In this article, we will guide you through the step-by-step process of setting up your G Router IP cam, ensuring that you have a secure and reliable network connectivity. Whether you're a beginner or an experienced user, this guide will walk you through everything you need to know about configuring your IPCCTV camera system.
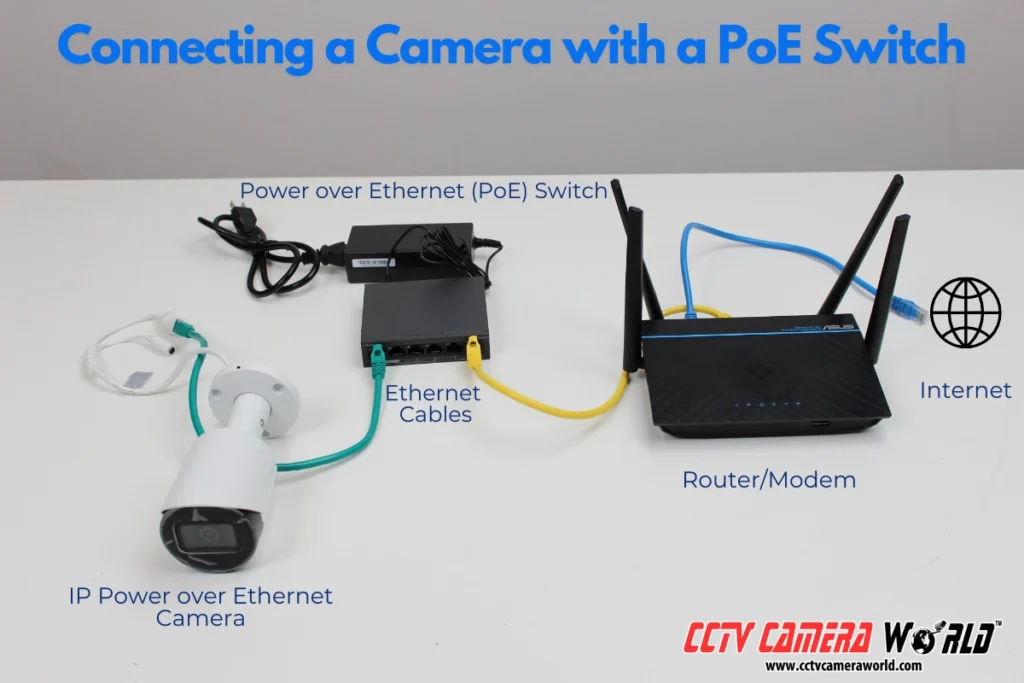
Step 1: Connecting the IP Camera to Your Local Area Network (LAN)
The first step in setting up your G Router IP cam is to connect the IP camera to your local area network (LAN). You can use an Ethernet cable (also known as Cat 5 or Cat 6 cable) to connect the IP camera to your router, gateway, or access point. If your IP camera has Wi-Fi capability, you can also connect it wirelessly to your network. However, a wired connection is more stable and secure than a wireless one.
Step 2: Configuring the IP Camera's Network Settings
Once you have connected the IP camera to your LAN, the next step is to configure the IP camera's network settings. This includes setting the IP address, subnet mask, gateway, and DNS server. You can usually find these settings in the IP camera's web interface or mobile app. It's essential to ensure that the IP camera is configured to use the same subnet as your router and that the gateway IP address is set to the IP address of your router.
Step 3: Forwarding Ports on the Router
To access your IP camera remotely, you need to forward ports on your router. This will allow incoming traffic to reach your IP camera. You'll need to forward the port numbers specified in the IP camera's documentation to the IP address of your IP camera. This is usually done through the router's web interface or mobile app.
Step 4: Accessing the IP Camera Remotely
Once you have configured the IP camera's network settings and forwarded ports on the router, you can access the IP camera remotely. You can use a web browser or a mobile app to access the IP camera's web interface. Make sure to use the correct IP address and port number to access the IP camera.
Troubleshooting Tips
- Check the IP camera's network settings to ensure that they are correctly configured.
- Verify that the ports are forwarded on the router.
- Check the IP camera's web interface or mobile app to ensure that remote access is enabled.
- Test remote access to ensure that it is working correctly.
Conclusion
Configuring your G Router IP cam is a straightforward process that requires attention to detail. By following the steps outlined in this guide, you can ensure that your IP camera is set up for seamless surveillance and remote monitoring. Remember to troubleshoot any issues that may arise during the setup process, and don't hesitate to seek help if you need it. With this comprehensive guide, you'll be able to unlock the full potential of your IP camera system.
Common Questions and Answers
Q: What is the default IP address of my IP camera?
A: The default IP address of your IP camera is usually 192.168.1.109. However, this may vary depending on the manufacturer and model of your IP camera. Consult your IP camera's documentation or manufacturer's website for more information.
Q: How do I forward ports on my router?
A: To forward ports on your router, you need to access the router's web interface or mobile app and navigate to the port forwarding settings. You'll need to specify the IP address of your IP camera, the port numbers to forward, and the protocol (TCP or UDP) to use.


 - ipcent.com")


