D-Link G Router Setup Tutorial: A Step-by-Step Guide
Are you struggling to set up your D-Link G router? Look no further! In this comprehensive tutorial, we will walk you through the process of setting up your D-Link G router from scratch. Whether you're a beginner or an experienced user, this guide will provide you with the necessary steps to configure your router and establish a secure and efficient home network.
Step 1: Unpacking and Preparation
The first step in setting up your D-Link G router is to unpack it and prepare the necessary components. Make sure you have the following items:
- D-Link G router
- Power cord
- Internet cable (RJ-45)
- Wireless antenna (if applicable)
Once you have all the necessary components, locate a suitable place for your router. Make sure it's close to your modem and a computer for the initial setup process.
Step 2: Logging In to the Router
Insert the power cord into the router and plug, and turn it on. Wait for the router to boot up and establish a connection with your modem.
Next, open a web browser (e.g., Google Chrome, Mozilla Firefox, etc.) and type in the router's IP address: 192.168.0.1 or 192.168.1.1. Press Enter to access the router's web interface.
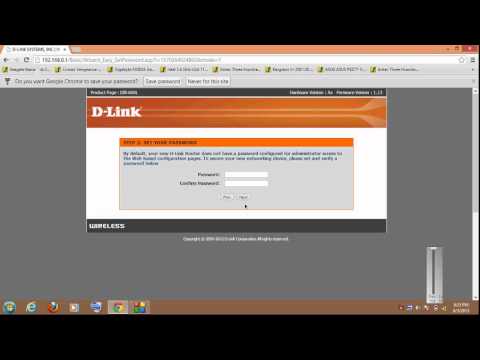
Step 3: Changing the Administrator Password
Once you log in to the router's web interface, you will be prompted to change the administrator password. Make sure to create a strong and unique password to secure your router.
Click on the "Administration" tab, then select "Management" from the drop-down menu. Enter a new administrator password and confirm it. Click "Apply" to save the changes.
Step 4: Configuring the Wireless Settings
To configure the wireless settings, click on the "Wireless" tab and select "Wireless Settings" from the drop-down menu. Make sure the wireless mode is set to "G" and the SSID (network name) is changed to a unique and memorable name.
Set the wireless channel to "Auto" and the encryption method to "WPA2-PSK." Create a strong wireless password and confirm it. Click "Apply" to save the changes.
Step 5: Configuring the LAN Settings
Click on the "LAN" tab and select "LAN Settings" from the drop-down menu. Set the IP address to "192.168.0.1" (or "192.168.1.1") and the subnet mask to "255.255.255.0." Set the default gateway to "192.168.0.1" (or "192.168.1.1").
Make sure the DNS settings are set to "Automatic" or configure them according to your ISP's requirements.
Step 6: Saving and Applying the Changes
After configuring the wireless and LAN settings, click on the "Save" button to save the changes. Then, click on the "Apply" button to apply the changes to the router.
Wait for the router to reboot and apply the new settings. This may take a few minutes.
Step 7: Verifying the Connection
Once the router has rebooted, verify that you have a stable internet connection. Open a web browser and navigate to a website (e.g., Google.com). If you're connected to the internet, you should see the website's content.
Repeat the same process with your mobile device (if applicable) to verify that you have a stable wireless connection.
Conclusion
Congratulations! You have successfully set up your D-Link G router. This comprehensive tutorial has walked you through the process of configuring your router's wireless and LAN settings, ensuring a secure and efficient home network.
Remember to change the administrator password and create a strong wireless password to secure your router. If you encounter any issues or have questions, feel free to reach out to D-Link's support team or consult the user manual.
Troubleshooting Tips
Encountering issues with your router's setup or configuration? Don't worry! Here are some troubleshooting tips to help you resolve common issues:


