Configure TP-LINK Router As Access Point: A Step-by-Step Guide
Are you looking to transform your wired network into a wireless one? Look no further! This article will guide you through the process of configuring your TP-LINK router as an access point, which can extend your network coverage and provide a convenient wireless connection to your devices.
What is TP-LINK Router Access Point Mode?
When you configure your TP-LINK router as an access point, it connects to your main router or switch via an Ethernet cable and extends your wireless coverage. In this mode, your router acts as a wireless bridge, providing a wireless connection to your devices while maintaining a wired connection to your main network.
Benefits of Configuring TP-LINK Router as Access Point
- Extended Network Coverage: By connecting your TP-LINK router to your main router, you can extend your wireless coverage to areas of your home or office that were previously not covered.
- Convenience: With a wireless connection, you can access your network from anywhere in your home or office without having to use Ethernet cables.
- Simplified Network Setup: Configuring your TP-LINK router as an access point can simplify your network setup and make it easier to manage your wireless network.
Prerequisites for Configuring TP-LINK Router as Access Point
- TP-LINK Router: Make sure you have a TP-LINK router that supports access point mode.
- Wired Connection: You will need a wired connection to your main router to configure your TP-LINK router as an access point.
- Admin Privileges: You need to have admin privileges to access your router's settings and configure it as an access point.
Step-by-Step Instructions for Configuring TP-LINK Router as Access Point
To configure your TP-LINK router as an access point, follow these steps:
Step 1: Check if your TP-LINK Router has Operation Mode Option
Check your router's left side menu to see if it has an Operation Mode option. If it does, proceed to the next step. If not, you may need to check your router's documentation or support website for more information.
Step 2: Connect to your Router's Web Interface
Type the router's default IP address or tplinkwifi.net into your web browser and log in to your router's web interface using the default username and password, which is usually "admin." If you've changed the password or want to reset it to the default, consult your router's documentation or support website for more information.
Step 3: Access your Router's Settings
Once you're logged in, click on the "Advanced" or "Administration" tab to access your router's settings. From here, you can configure your TP-LINK router as an access point.
Step 4: Select Access Point Mode
Locate the "Operation Mode" or "Access Point Mode" section and select "Access Point" as the operation mode. This will configure your TP-LINK router to act as a wireless access point.
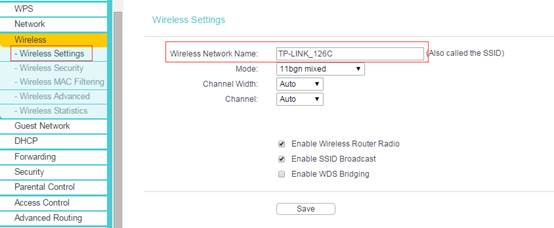
Step 5: Configure your Router's Settings
Configure your router's settings according to your needs, such as setting up a wireless network name and password, configuring wireless channels, and setting up Quality of Service (QoS) settings.
Conclusion
Configuring your TP-LINK router as an access point is a simple process that can extend your network coverage and provide a convenient wireless connection to your devices. By following the step-by-step instructions outlined in this article, you can easily configure your TP-LINK router as an access point and enjoy a stronger and more reliable wireless network.


 | Step-by-Step")
![Setup TP-Link Router as a Wireless Access Point [2 Methods]](https://static.tp-link.com/image002_1574665415161l.png "Setup TP-Link Router as a Wireless Access Point [2 Methods]")


1.0_normal_20210812031127k.png "How to Setup TP-Link Router as a Wireless Access Point - YouTube")


