Installing 6G Router in Flash Network
In recent years, the rise of Wi-Fi 6E and 6G routers has revolutionized the way we access and experience the internet. These advanced routers offer faster speeds, better connectivity, and greater reliability, making them a must-have for any modern network setup. However, installing a new 6G router in a flash network can be a daunting task, especially for those who are not familiar with network configurations.
In this article, we will guide you through the process of installing a 6G router in a flash network, covering the necessary steps, precautions, and troubleshooting tips to ensure a smooth setup. Whether you're a tech-savvy individual or a beginner, this article will provide you with a comprehensive understanding of how to install a 6G router in a flash network.
Compatibility and Precautions
Before you start the installation process, it's essential to ensure that your router is compatible with your existing network setup. Make sure to check the router's specifications and consult with your network administrator to ensure that it can support the 6G frequency band. Additionally, ensure that all devices connected to the network are compatible with Wi-Fi 6E or 6G.
Hardware Requirements
Here are the basic hardware requirements to install a 6G router in a flash network:
- A 6G router (with a compatible frequency band)
- A computer or mobile device with a compatible operating system (Windows 10 or later, macOS operate without any disruption)
- A stable and reliable network connection
- A reliable power source
Step-by-Step Installation Guide
Step 1: Unpacking and Preparing the Router
Before you start the installation process, make sure to read the user manual and understand the installation process. Remove all packaging materials, and carefully take out the router. Handle the router with care, as it's an electronic device that can be damaged easily.
Locate the mounting holes on the bottom of the router and mark the installation point on the wall. This will ensure that the router is mounted at a level and secure position.
Step 2: Mounting the Router
Mount the router on the wall using the screws or anchors provided. Ensure that the router is securely fastened, and the mounting holes are tightened snugly.
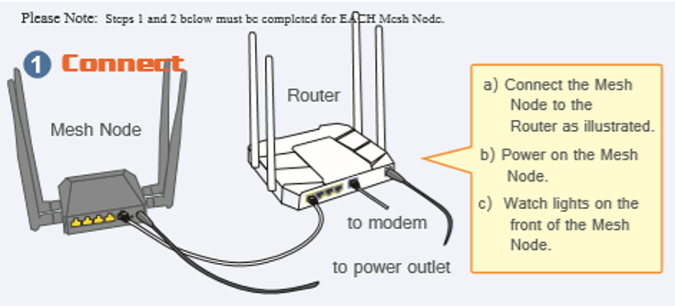
Step 3: Connecting Power and Initialization
Connect the power cable to the router and plug it into a reliable power source. Press the power button on the router, and allow it to boot up completely.
Once the router is powered on, you will need to initialize it by completing the setup process. This will involve setting up your network credentials, Wi-Fi settings, and other configuration settings.
Step 4: Connecting to the Network
Connect your device to the router using Wi-Fi or a cable. Make sure that the connection is stable and secure. Test the internet connection by checking websites or streaming online content.
Step 5: Upgrade and Firmware Update
After completing the basic setup, you may need to upgrade or update the firmware of the router to ensure compatibility and optimal performance. Use the manufacturer's software to perform a firmware upgrade.
Step 6: Configure Advanced Settings
Once the initial setup is complete, you can configure advanced settings, such as Quality of Service (QoS), guest networks, and accessibility settings. This will help you customize your network to meet your specific requirements.
Conclusion
Installing a 6G router in a flash network can be a challenging task, but by following the steps outlined in this guide, you can ensure a smooth and stress-free installation. Remember to check the compatibility of your devices, follow the installation instructions carefully, and troubleshoot any issues that may arise during the process.
By following these steps, you can enjoy faster, more reliable internet connectivity with a 6G router, and transform the way you experience the internet.


 Self-Install Kit")


