Wireless Network Configuration for Security Cameras: A Comprehensive Guide
With the increasing demand for home and business surveillance, wireless security cameras have become a popular choice for monitoring properties. However, setting up and configuring a wireless network for security cameras can be a daunting task, especially for those without technical expertise. In this article, we will provide a step-by-step guide on how to configure a wireless network for security cameras, ensuring a secure and seamless experience.
Understanding Wireless Security Cameras
Wireless security cameras, also known as Wi-Fi security cameras or wireless IP cameras, are equipped with an integrated client radio that connects to a 2.4 GHz (802.11 b/g/n) Wi-Fi network. These cameras offer flexibility and convenience, allowing users to monitor their properties remotely using mobile devices or computers. For optimal performance, it is essential to configure the camera settings through the system's software and test the camera's view and recording before finalizing the installation.
Setting Up a Wireless Network for Security Cameras
- Connect the IP camera to your local area network (LAN) using an Ethernet cable (Cat 5 or Cat 6 cable). If your IP camera has Wi-Fi capability, you can also connect it wirelessly to your network. However, a wired connection is more stable and secure than a wireless one.
- Configure the camera's IP address and subnet mask to match your network's settings. You can find the IP address and subnet mask in your router's configuration settings or by accessing the camera's web interface.
- Set up the camera's Wi-Fi network name (SSID) and password. Ensure that the SSID and password are strong and unique to prevent unauthorized access to your network.
- Connect the camera to your router using a Wi-Fi network. You can use the camera's web interface or mobile app to connect to the network and configure the settings.
Ensuring a Secure Connection
To ensure a secure connection, use a strong password for your Wi-Fi network. Update your camera's firmware to the latest version, as newer firmware often includes security patches and features to enhance the camera's performance and security. Regularly check for firmware updates and install them as soon as possible to prevent potential security vulnerabilities.
Wireless Camera System Configuration
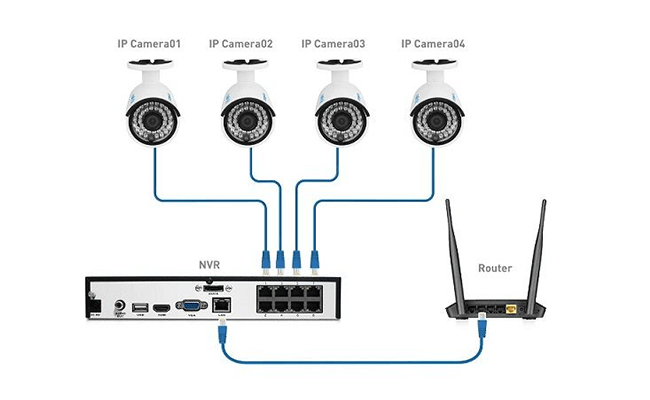
A wireless camera system typically consists of multiple cameras and a central hub or NVR (Network Video Recorder) that controls and monitors all cameras. The NVR is responsible for recording and storing video footage from the cameras, making it easy to manage your security setup from one place.
IP Camera Network Setup
IP camera network setup can be confusing and technically demanding. However, with the latest technology in IP camera networking, setting up an IP camera network has become easier. You can use a PoE (Power over Ethernet) switch or an external PoE solution to power and connect your IP cameras to the network. Our guide covers hardware and software setup, troubleshooting, and technical insights for a robust NVR connection.
Common Mistakes to Avoid
When setting up a wireless network for security cameras, it's essential to avoid common mistakes that can compromise the security and performance of your system. Some common mistakes include:
- Using a weak or default password for your Wi-Fi network.
- Not updating the camera's firmware regularly.
- Not configuring the camera's settings properly.
- Not testing the camera's view and recording before finalizing the installation.
Conclusion
Configuring a wireless network for security cameras requires careful planning and execution. By following the steps outlined in this guide, you can ensure a secure and seamless experience. Remember to test your cameras, optimize performance, and avoid common mistakes for maximum security. With this ultimate guide, you now have the knowledge to confidently install and manage your wireless security cameras—ensuring your property is safe, monitored, and secure.


![How to Set Up an IP Camera [Step-by-Step Guide] - eufy US](https://cucctv.co.uk/wp-content/uploads/dahua-nvr-setup-1024x984.jpg "How to Set Up an IP Camera [Step-by-Step Guide] - eufy US")


 Certification | CompTIA")


 Certification | CompTIA Global")

