Enhance the Comfort of Your Staircase House with Ceiling Fan Installation
A ceiling fan installation staircase house is a great way to improve the overall comfort and ambiance of your home, especially during the warmer months. With the right installation, a ceiling fan can efficiently circulate air throughout your house, making it feel cooler and more pleasant. In this article, we will guide you through the process of ceiling fan installation staircase house, highlighting the key considerations and steps involved.
Why Install a Ceiling Fan?
- Energy Efficiency: Ceiling fans use less energy than air conditioning, making them an economical choice for cooling your home.
- Year-Round Use: Ceiling fans can be used during both summer and winter months to improve air circulation and reduce heating bills.
- Design Flexibility: Ceiling fans come in a variety of styles and designs, making it easy to find one that matches your home's decor and aesthetic.
- Easy Maintenance: Cleaning and maintaining a ceiling fan is relatively simple, ensuring it continues to operate effectively and efficiently.
Choosing the Right Ceiling Fan
Before starting the ceiling fan installation staircase house process, it's essential to select a suitable fan that meets your needs and complements your home's style. Consider the following factors when choosing a ceiling fan:
- Size: Ensure the ceiling fan is the right size for the room, taking into account the diameter of the fan and the distance between the fan housing and the ceiling.
- Lighting: Choose a ceiling fan with a light kit or a separate light fixture to provide additional illumination in the room.
- Motor Type: Consider the type of motor used in the fan, such as DC or AC, and its power consumption.
- Mounting Type: Decide whether you prefer a standard downrod mount or a close-to-ceiling mount, depending on the ceiling height and fan size.
Step-by-Step Ceiling Fan Installation Staircase House Guide
Follow these steps for a safe and successful ceiling fan installation staircase house process:
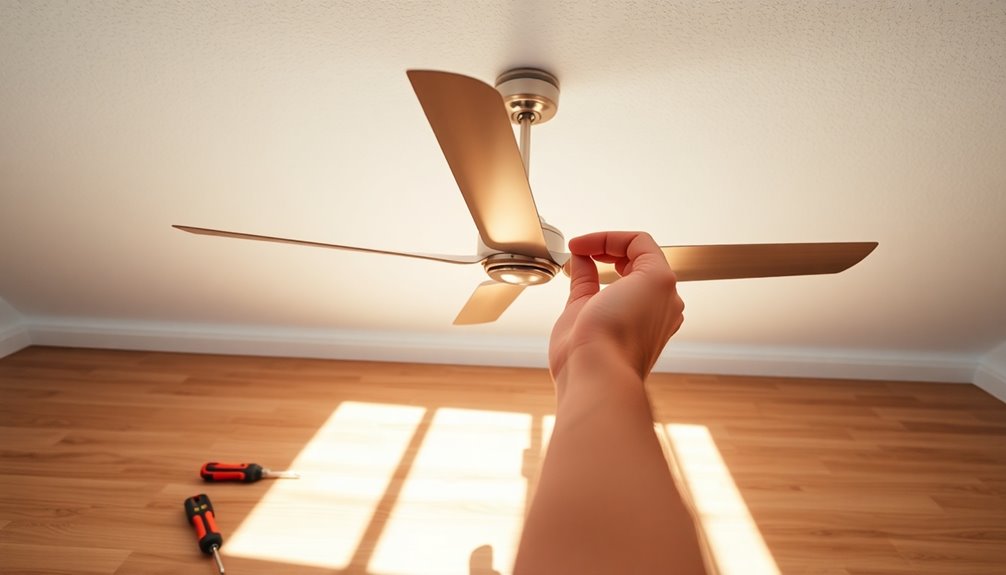
- Plan and Prepare: Shut off the power to the fan circuit at the electrical panel, and remove any old ceiling fan or light fixture. Ensure you have all the necessary tools and materials, including a voltage tester and a ladder.
- Measure and Mark: Measure the distance between the fan housing and the ceiling, and mark the correct position on the ceiling to avoid any obstructions.
- Install the Mounting Bracket: Attach the mounting bracket to the ceiling joist, ensuring it is securely fastened with screws or nails.
- Hang the Fan: Carefully lift the fan and attach it to the mounting bracket, ensuring it is level and plumb.
- Connect the Wiring: Connect the fan's wiring to the electrical connections, following the manufacturer's instructions and taking all necessary safety precautions.
- Test the Fan: Turn on the power and test the fan to ensure it is operating correctly and efficiently.
Conventional Installation for Basements to 3rd Floor
When installing a ceiling fan in a multi-story house with a spiral staircase, it's recommended to locate the fan at the top center of the ceiling above the staircase. This will provide optimal air circulation and reduce the risk of cold air gathering in the attic.
Stairway Ceiling Fan Direction in Winter
In winter, aim to distribute warm air evenly throughout the house. A fan will help circulate warm air from the upper floors to the lower floors, ensuring a more even temperature distribution.
Benefits of Ceiling Fan Installation Staircase House
The benefits of ceiling fan installation staircase house include:
- Improved air circulation, reducing the need for air conditioning
- Increased energy efficiency, reducing your energy bills
- Enhanced comfort and ambiance, making your home feel warmer during winter and cooler during summer
- Increased design flexibility, allowing you to choose a fan that matches your home's style and aesthetic


")


 | Family Handyman")


