Setting Up a G Wireless Router Guest Network: A Comprehensive Guide
Are you looking for a way to provide secure internet access to your guests without compromising your personal devices and data? Setting up a guest network on your G wireless router is a great solution. In this article, we will walk you through the process of creating a guest network, including the benefits, requirements, and step-by-step instructions.
What is a Guest Network?
A guest network is a separate network that is created on your router that allows guests to connect to the internet without giving them access to your main network and devices. It's like creating a separate Wi-Fi access point that doesn't affect your primary network. This allows you to control who has access to your internet and maintain the security and integrity of your home network.
Benefits of Setting Up a Guest Network
- Security: By separating your guest network from your main network, you can prevent any malware or viruses from spreading to your devices.
- Flexibility: Setting up a guest network allows you to offer internet access to guests without giving them access to your devices or sensitive data.
- Control: You can control who has access to your guest network and when they have access.
- Customization: You can set up your guest network to use a different SSID, password, and even set restrictions on the websites that can be accessed.
Requirements for Setting Up a Guest Network
Before you start setting up your guest network, you'll need to make sure that your router supports this feature. Most modern routers have this feature, but it's always best to check your router's specifications to confirm.
Setup G Wireless Router Guest Network
Step 1: Access Your Router's Web Interface
Open a web browser and type the IP address of your router in the address bar. The IP address is usually 192.168.1.1 or 192.168.0.1. Enter your router's admin login credentials, which can be found in the user manual or on the router itself.
Step 2: Enable the Guest Network Feature
Once you're logged in to the router's web interface, look for the guest network feature. It's usually located under the "Advanced Wireless Settings" or "Guest Network" section. Enable the guest network feature and set the SSID (name) and password for the guest network.
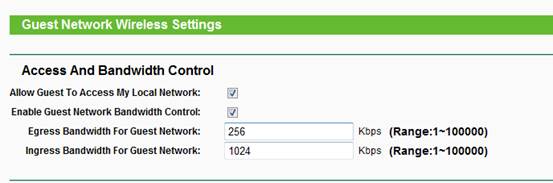
Step 3: Configure the Guest Network Settings
Configure the guest network settings to your liking. You can set restrictions on the websites that can be accessed, set up a separate IP address range for the guest network, and even set up a different DNS server.
Step 4: Save Your Changes
Once you've configured the guest network settings, save your changes and reboot the router to apply the changes.
Using Your Guest Network
Now that you've set up your guest network, your guests can connect to the internet by selecting the guest network SSID from their device and entering the guest network password. You can control who has access to the guest network and when they have access, and you can even set up restrictions on the websites that can be accessed.
Tips and Tricks
- Make sure to change the default admin login credentials for your router to prevent unauthorized access.
- Use a strong password for the guest network to prevent unauthorized access.
- Set up a different SSID (name) and password for the guest network to prevent confusion between the guest network and your main network.
- Configure the guest network settings to your liking to ensure that it meets your specific needs.
Conclusion
Setting up a guest network on your G wireless router is a great way to provide secure internet access to your guests without compromising your personal devices and data. By following the steps outlined in this article, you can create a guest network that meets your specific needs and provides a secure and convenient way for your guests to access the internet.


.png "How to Configure Guest WiFi: A Step-by-Step Guide")
![How to Set Up a Guest WiFi Network [Step-by-Step Guide] - Reolink](https://i.ebayimg.com/images/g/MAIAAOSwi2Zi4cC~/s-l1600.jpg "How to Set Up a Guest WiFi Network [Step-by-Step Guide] - Reolink")


